Butterfinger balls are a delightful treat that combines the irresistible flavors of chocolate, peanut butter, and the signature crunch of Butterfinger candy. This no-bake dessert is a crowd-pleaser, perfect for holidays, parties, or just a simple indulgence. In this guide, we’ll explore everything from the classic recipe to creative twists, helpful tips, and answers to frequently asked questions about this tasty confection. Let’s dive in!
Introduction to Butterfinger Balls
What Are Butterfinger Balls?
Butterfinger balls are small, bite-sized confections made from a mixture of peanut butter, crumbled Butterfinger candy bars, and a chocolate coating. Their creamy texture, combined with the candy’s signature crunch, makes them a fan favorite for those who enjoy a balance of sweet and salty flavors. Plus, they’re incredibly easy to prepare, requiring no baking at all!
Why Are They So Popular?
What’s not to love about these treats? They’re simple, quick to make, and perfect for satisfying a sweet tooth. Whether you’re hosting a party or looking for a homemade gift idea, Butterfinger balls fit the bill. Their no-bake nature also means minimal fuss in the kitchen ideal for busy bakers or beginners.
The Appeal of No-Bake Treats
In a world where convenience matters, no-bake recipes are a blessing. Butterfinger balls are not only delicious but also versatile. You can whip them up in under 30 minutes, and they’re highly customizable. With just a few tweaks, you can adapt this recipe to fit different dietary preferences or festive occasions.
Ingredients and Essential Tools for Butterfinger Balls
Key Ingredients for the Classic Recipe
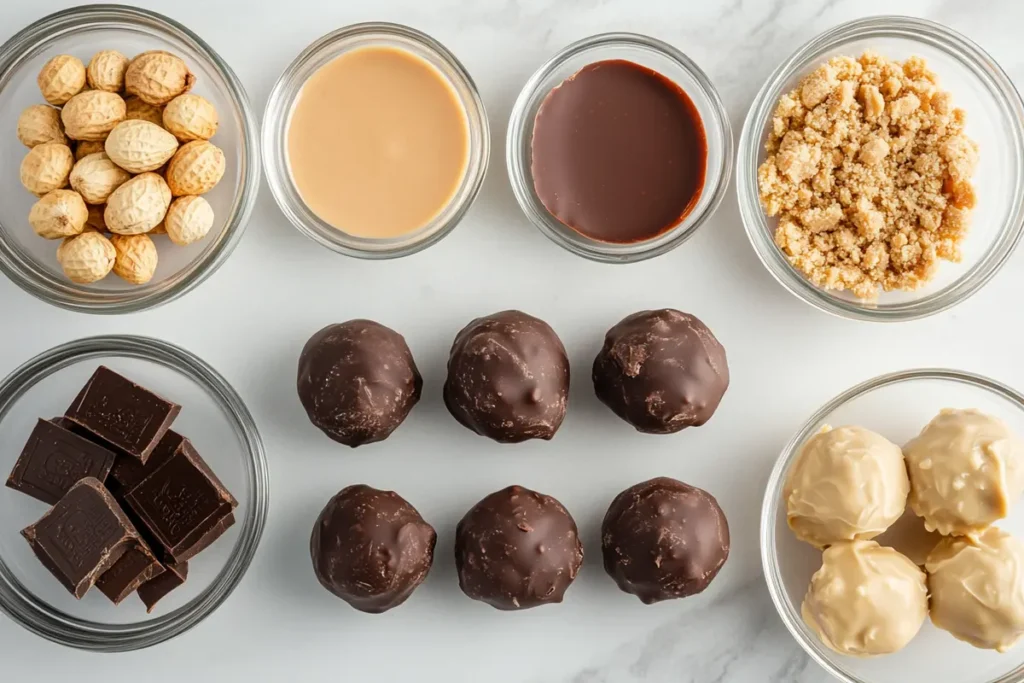
To make delicious butterfinger balls, you need a few simple ingredients. These essentials come together to create the perfect mix of creamy, crunchy, and chocolaty goodness:
- Butterfinger Candy Bars: The star ingredient provides the iconic crunch and peanut butter flavor. Crush them finely for a smooth texture.
- Peanut Butter: Use creamy peanut butter for the best consistency. It helps bind the mixture and balances the sweetness.
- Chocolate Coating: Melted chocolate either milk or semi-sweet gives the butterfinger balls their irresistible outer layer.
- Powdered Sugar: Adds sweetness and firmness to the mixture, ensuring the balls hold their shape.
- Butter: Softened butter adds richness and helps blend the ingredients smoothly.
Optional Add-Ins for Variety
To customize your butterfinger balls, consider adding:
- Mini Marshmallows: For a chewy texture.
- Shredded Coconut: Adds a tropical twist.
- Crushed Cookies: Use graham crackers or wafer cookies for extra crunch.
- Sea Salt: A pinch of salt enhances the sweet and nutty flavors.
Essential Kitchen Tools
Preparing butterfinger balls doesn’t require fancy equipment, but having these tools makes the process easier:
- Mixing Bowls: Use medium-sized bowls to combine your ingredients effortlessly.
- Melting Pot or Microwave-Safe Bowl: For melting chocolate evenly without burning it.
- Baking Sheet: Lined with parchment paper, it’s perfect for resting the coated butterfinger balls.
- Spoons or Cookie Scoop: Helps portion out the mixture evenly, ensuring uniform sizes.
With these ingredients and tools ready, you’re set to create mouthwatering butterfinger balls. Let’s explore the next step: making the classic recipe!
Classic Butterfinger Balls Recipe
Step-by-Step Preparation
Making butterfinger balls is simple and fun. Follow these steps for a batch that’s guaranteed to impress:
- Crush the Butterfinger Bars: Place the candy bars in a zip-top bag and crush them with a rolling pin or food processor until fine.
- Mix the Ingredients: In a mixing bowl, combine the crushed Butterfinger bars, peanut butter, softened butter, and powdered sugar. Stir until the mixture is smooth and holds together.
- Form the Balls: Using a spoon or cookie scoop, portion out small amounts of the mixture. Roll them into bite-sized balls with your hands.
- Chill the Balls: Place the formed balls on a lined baking sheet and refrigerate for 30 minutes to firm up.
- Melt the Chocolate: While the balls chill, melt the chocolate in a microwave-safe bowl or double boiler until smooth. Stir frequently to avoid burning.
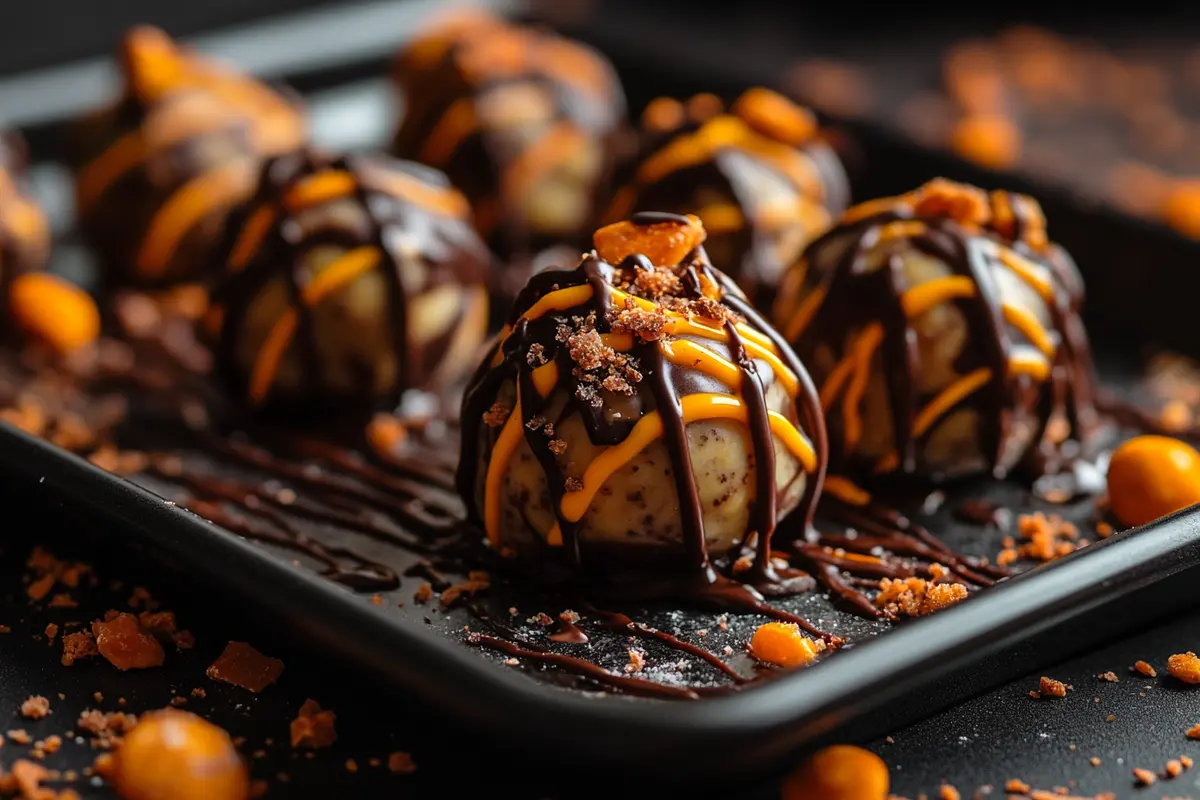
- Coat the Balls: Dip each chilled ball into the melted chocolate using a fork or dipping tool. Let any excess chocolate drip off before placing the ball back on the parchment paper.
- Cool and Set: Let the coated balls rest at room temperature or in the fridge until the chocolate hardens.
Common Mistakes to Avoid
Avoid these pitfalls to ensure your butterfinger balls turn out perfectly:
- Overheating the Chocolate: Melt the chocolate slowly to keep it smooth and shiny.
- Skipping the Chilling Step: Without chilling, the balls may fall apart when dipped.
- Too Much or Too Little Sugar: Adjust the powdered sugar to ensure the mixture holds its shape without being too dry or sticky.
Pro Tips for a Perfect Batch
- Double-Coat the Balls: For extra indulgence, dip the balls twice in chocolate for a thicker shell.
- Decorate for a Festive Touch: Add sprinkles, chopped nuts, or a drizzle of white chocolate on top.
- Work in Small Batches: Keep some of the mixture in the fridge while shaping to prevent it from getting too soft.
With this classic recipe, your butterfinger balls will be a hit at any gathering. Whether it’s for a holiday party or a quick snack, these treats never disappoint!
Creative Variations of Butterfinger Balls
Butterfinger Cheesecake Balls
Butterfinger cheesecake balls are a decadent twist on the classic recipe. By blending cream cheese into the base mixture, you get a rich, tangy flavor that pairs beautifully with the sweetness of the Butterfinger candy. Here’s how to make them:
- Add Cream Cheese: Soften 8 ounces of cream cheese and mix it with the peanut butter and crushed Butterfinger bars.
- Shape and Chill: Form the mixture into balls and refrigerate for at least 30 minutes.
- Coat with Chocolate: Dip each ball in melted chocolate for a smooth finish.
This variation is perfect for those who love a creamy texture in their desserts.
Holiday-Themed Butterfinger Balls
Butterfinger balls can easily be customized for holidays and celebrations. With a few simple additions, you can make them festive:
- Christmas: Add red and green sprinkles to the chocolate coating.
- Halloween: Use orange and black candy melts for a spooky touch.
- Easter: Decorate with pastel-colored candy drizzles or tiny edible flowers.
These themed butterfinger balls are great for parties or as edible gifts during the holiday season.
Healthy and Low-Sugar Alternatives
For those who want to enjoy butterfinger balls with fewer calories, try these healthy swaps:
- Natural Peanut Butter: Opt for unsweetened peanut butter to reduce added sugar.
- Dark Chocolate Coating: Use 70% dark chocolate for a less sweet and antioxidant-rich option.
- Homemade Butterfinger Crumbles: Make your own crumbles with crushed cereal and a light layer of melted peanut butter and chocolate.
These options let you indulge in butterfinger balls guilt-free while still savoring the signature flavors.
Serving, Storing, and Gifting Butterfinger Balls
Presentation Ideas for Parties
When serving butterfinger balls at parties, presentation matters. Arrange the balls on a decorative platter lined with parchment paper. Add a pop of color by including sprinkles, edible glitter, or drizzled white chocolate. If hosting a themed event, coordinate the decorations on the butterfinger balls with the event’s color scheme.
For a fun twist, serve the balls on skewers to make them easier to pick up. This also doubles as a unique party favor for guests.
Storing for Freshness
Butterfinger balls are easy to store and keep fresh for days:
- Refrigeration: Store them in an airtight container in the fridge for up to two weeks. Separate layers with parchment paper to prevent sticking.
- Freezing: For longer storage, freeze butterfinger balls in a freezer-safe container. They’ll last up to three months and can be enjoyed straight from the freezer or thawed slightly.
Proper storage ensures your butterfinger balls retain their texture and flavor.
Packaging Tips for Gifts
Butterfinger balls make thoughtful homemade gifts, especially during the holiday season. To package them beautifully:
- Place the balls in decorative paper liners and arrange them in a box.
- Add a ribbon and a handwritten note to make the gift extra special.
- Use a clear gift bag and tie it with festive string for a simple but elegant presentation.
For more delicious recipes and creative dessert ideas, check out Cinnamon Roll Cheesecake, a decadent treat that complements the sweetness of butterfinger balls.
Butterfinger balls are versatile treats that work well for any occasion, whether you’re entertaining, gifting, or just enjoying them yourself. With these tips, you’ll always have a sweet treat ready to impress!
FAQs About Butterfinger Balls
How Long Do Butterfinger Balls Last?
Butterfinger balls can last quite a while if stored properly. When kept in the refrigerator in an airtight container, they remain fresh for up to two weeks. If you freeze them, they can last up to three months without losing their delicious flavor or texture. For the best taste, allow frozen butterfinger balls to thaw slightly before serving.
Can I Freeze Butterfinger Balls?
Yes, you can freeze butterfinger balls, which is a great way to prepare them ahead of time. To freeze, place the balls on a lined baking sheet until firm, then transfer them to a freezer-safe container. Be sure to separate the layers with parchment paper to avoid sticking. This method keeps the butterfinger balls intact and ready to enjoy whenever you need a quick dessert.
What Can I Substitute for Butterfinger Candy Bars?
If Butterfinger candy bars aren’t available, there are other options to achieve similar flavors. Crushed peanut butter cookies or toffee candy bits can mimic the crunch, while a mix of peanut butter and crushed cereal (like cornflakes) offers a close alternative. These substitutes allow you to still create butterfinger balls with minimal hassle.
Why Are My Butterfinger Balls Falling Apart?
If your butterfinger balls are too crumbly, the mixture might need more moisture or binding agents. Adding a bit more peanut butter or softened butter can help everything stick together better. Be sure to chill the balls thoroughly before dipping them in chocolate to prevent them from breaking apart during the coating process.
Conclusion and Final Thoughts
Butterfinger balls are a delightful treat that is as fun to make as it is to eat. With their simple ingredients and no-bake process, they’re an ideal choice for busy bakers and dessert lovers alike. Whether you stick with the classic recipe or experiment with creative variations, butterfinger balls are sure to please everyone.
These bite-sized treats are perfect for any occasion, from casual get-togethers to festive celebrations. Plus, their ease of storage and gifting options make them a versatile dessert that never goes out of style.
Start making your own butterfinger balls today, and don’t be afraid to get creative with flavors and decorations. Once you try them, they’ll likely become one of your favorite go-to desserts!
Tips and Tricks for Perfect Butterfinger Balls
Simple Tricks to Improve Your Butterfinger Balls
Making butterfinger balls is easy, but a few small adjustments can make a big difference in the final product. Here are some helpful tips:
- Use Room-Temperature Ingredients: Peanut butter and butter mix more smoothly when they’re not cold. This ensures a consistent texture in your butterfinger balls.
- Chill Before Coating: Chilling the balls before dipping them in chocolate helps them hold their shape and prevents them from falling apart during the process.
- Work in Small Batches: If the mixture starts to get soft while shaping, place it back in the fridge for a few minutes to firm up.
These simple tricks can save time and make the process smoother, especially if you’re making a large batch.
Elevate Your Presentation for Butterfinger Balls
Presentation plays a big role in how butterfinger balls are received. For a polished look:
- Use a Cookie Scoop: This tool helps create evenly sized balls, giving a professional appearance.
- Add Toppings Immediately: Sprinkles, crushed nuts, or drizzle should be applied right after dipping the balls in chocolate, while the coating is still wet.
- Create Variety: Use white, milk, or dark chocolate to coat different batches and arrange them together for a visually striking dessert tray.
These tips ensure your butterfinger balls not only taste amazing but look stunning too.
By following these tricks, you’ll be able to master the art of butterfinger balls, creating a treat that’s sure to impress!